Introduction
After running the configure.py script, alongside the jamba.sh (resp. jamba.bat) script, CMake creates a project for the given platform: XCode on macOS and Visual Studio on Windows. You can simply open the project to work on the plugin. You can also use CLion.
CLion (macOS)
- CLion uses a different toolchain based on Makefiles and not XCode. Because Audio Unit depends on XCode, you will need to run the
configure.pyandjamba.shcommand line utilities in order to generate the Audio Unit wrapper.
Basic Setup
CLion knows how to handle CMake project directly. You don’t even have to run the configure phase in order to open the plugin in CLion. Simply open the folder in CLion and it will load it and run CMake automatically.
If your CMakeLists.txt does not defined VST3_SDK_ROOT and you have not installed the SDK in the default location (and you have disabled downloading it), then you must specify it “Preferences / Build, Execution, Deployment / CMake / CMake options” like so: -DVST3_SDK_ROOT:PATH=/path/to/vst3. You may have to delete the cmake-build-debug folder after you set this variable since it is a CMake cache variable.
By default, CLion creates a folder called cmake-build-debug to do the build. This can be changed under “Preferences / Build, Execution, Deployment / CMake / Generation Path”
Recommended configurations
After loading the plugin in CLion, the various CMake targets are available as “Configurations”. By default all the targets generated by Jamba are prefixed with jmb_ (this is changeable). You can select any target and “Build” it.
So for example, if you want to run the editor, you would select the target jmb_run_editor and Build it.
This may sound counter intuitive: you are building a target, not running it although you are running the editorhost application. This is because the CMake target jmb_run_editor actually invokes a command (the editorhost runnable with the plugin as an argument).
This works quite well if you want to run the validator tool or the editor to make changes to your plugin. But it does not work if you want to debug the code as you cannot have a debugger during the build phase.
So here are some recommended ways on how to configure some targets for debugging purposes:
jmb_build_vst3
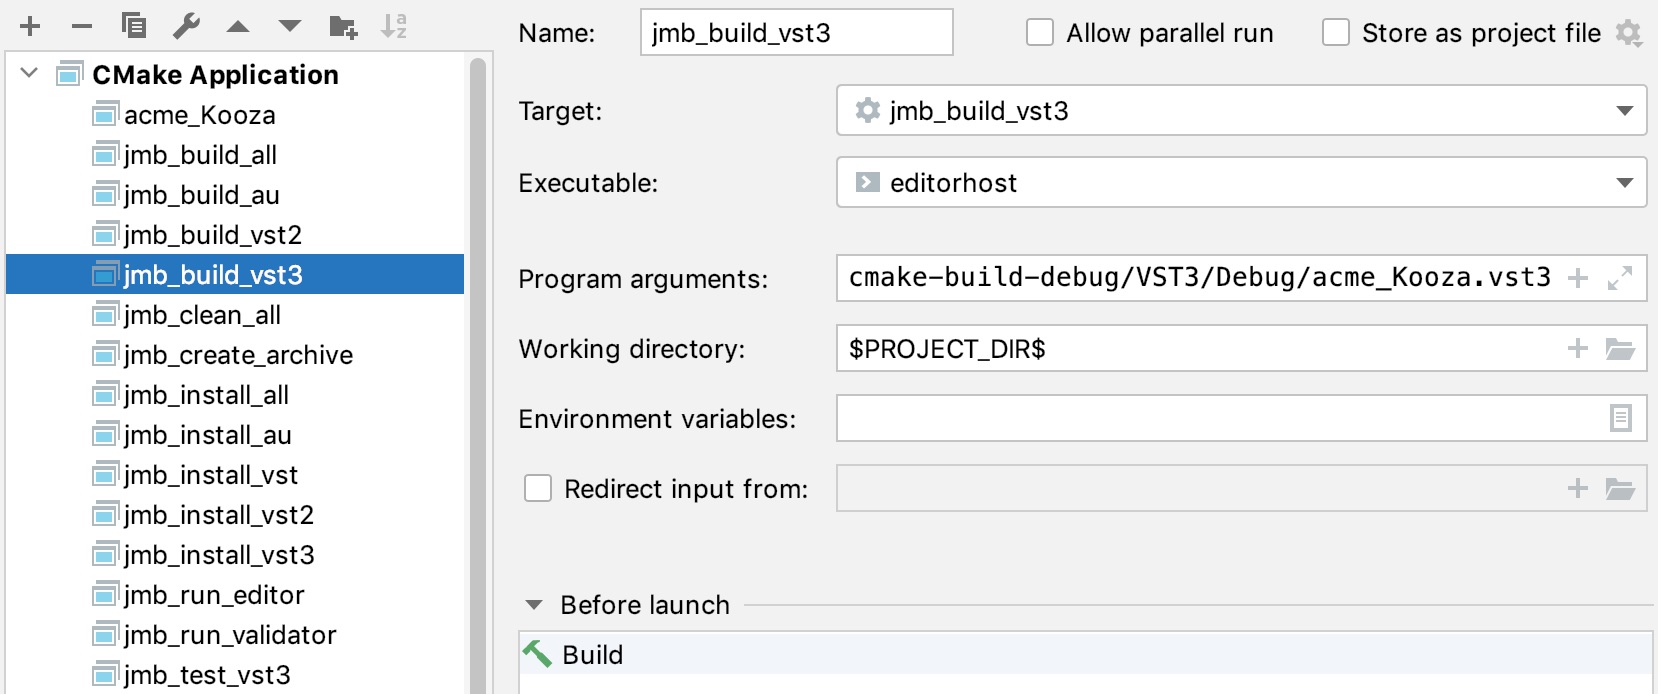
This configuration builds the vst3 plugin (following the quickstart steps it would be acme_Kooza.vst3). You can set it up so that you can automatically run the editorhost program after build if you select Run (resp. Debug) instead of Build. In order to configure it properly you need to setup the Program arguments and Working directory properly:

jmb_install_vst3
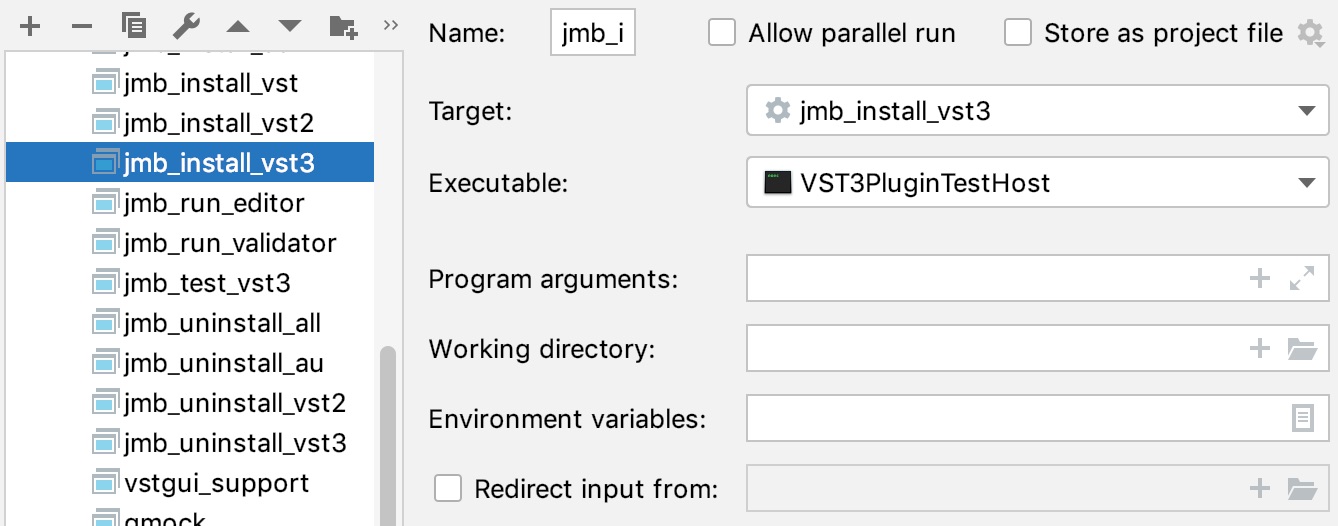
This configuration builds the vst3 plugin and installs it in the default VST3 installation folder. You can add a VST3 compatible DAW/host as an executable which will then allow to run your plugin directly in the DAW by selecting Run (or debug it by selecting Debug). In this example, the VST3PluginTestHost application (which comes with the VST3 SDK) will be run after install.
You must set the Executable to the actual executable (/Applications/VST3PluginTestHost.app/Contents/MacOS/VST3PluginTestHost) and not the app itself (/Applications/VST3PluginTestHost.app).

CLion (Windows 10+)
CLion on Windows works the same as macOS. So refer to the previous section for more details. Just make sure you select the proper toolchain (Visual Studio Build Tools 2019).
Visual Studio Code (Windows 10)
Although Visual Studio Code can run on several platforms, it is currently not possible to have os specific configuration. The blank plugin generated by Jamba contains configuration files for Windows 10 (under .vscode). You will need to edit/delete those files if you want to use Visual Studio Code on macOS.
Basic Setup
This section assumes that you have CMake Tools extension installed (a Microsoft extension and as of this writing the current version is 1.2.2)
-
Open Folder
Open the project by opening the folder containing the plugin
-
Configure CMake

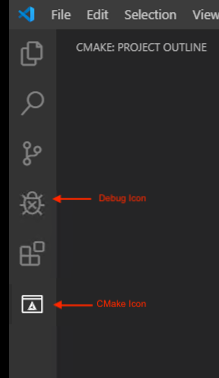
Click on the CMake Icon in the toolbar then click on ‘Configure’ icon at which point you will be prompted for a Kit. You should select “Visual Studio Build Tools 2019 - amd64”. This will configure CMake.
NoteThe plugin comes with a settings file for Visual Studio Code (
.vscode/settings.json) which specifies the proper generatorVisual Studio 17 2022. By default, a subfolderbuildwill be created (and can be changed in the CMake Tools extension preferences panel).TipVisual Studio Code should show a notification that states: CMake Tools would like to configure IntelliSense for this folder. It is strongly recommended to allow the action to proceed as the various includes (like the ones related to the VST3 SDK) will automatically be properly resolved.
TipAfter running this step, the
jamba.batexecutable will be available in thebuildfolder so you can also run any CLI command if you want (see jamba.sh for more details).
Building
At the bottom of the interface, you can then select the target you want to build (for example [jmb_build_vst3]) and then click on Build to build it.
On Windows, if you are using VST2, the build will fail as the pragma #warning is not recognized. Simply edit the <PluginName>_VST2.cpp file to enter a VST2 plugin ID and get rid of the compilation failure.
Debugging
The plugin comes with 2 predefined configurations to run and/or debug the plugin while running the validator or the editor (see file .vscode/launch.json for details).
You can simply click on the Debug icon in the toolbar and select Run Validator (Debug) (resp. Run Editor (Debug)) to run the validator (resp. the editor). You can add any breakpoints in the code in order to debug the plugin.
Visual Studio Code does not build (or rebuild) the vst or the tools (editor and validator) when you run these configurations so you have to do it manually if you make any changes or the very first time! If you know how to add this capability, please let me know.
You can add other configurations in .vscode/launch.json for example to run your favorite DAW and debug the plugin directly in it!
Other
Jetbrains offer other IDEs that support XCode project (AppCode) or Visual Studio (ReSharper C++), and in theory should be able to work seamlessly with the projects. This has not been tested…
