Introduction
One of the main pain point with developing a VST plugin is that it is very hard to even know where to start. The recommended approach is to copy/paste one of the example plugin and modify it. But it is not very clear what should or shouldn’t be changed. Nor is it obvious which command to run and with which parameters to start the editor, run the validation steps, generate an audio unit wrapper, etc… It turns out that none of it is trivial and is either poorly or simply not documented.
As of VST3 SDK 3.7.0, there is a new tool included to generate a blank VST3 plugin part of the distribution which is certainly a step up from copy/paste. That being said, it still doesn’t help with the developer lifecycle actions.
Jamba was specifically designed to simplify all this by
- providing a very easy way to generate a blank/skeleton plugin with all the necessary boiler plate code in the right place
- providing a way to automatically download and setup the required dependencies
- providing many convenient (CMake) targets to handle all the lifecycle actions required for developing a plugin
- providing a very simple to use script (
jamba.sh/jamba.bat) which takes care of invoking the proper cmake targets
Step 1 - Generate the skeleton plugin
You have 2 options to do this:
- you can follow the Web steps which lets you provide the information necessary directly in the browser and generate a zip file with the plugin ready to build. This is the recommended approach since you do not have to download and/or clone anything locally
- you can follow the Command Line steps which involves cloning the github repository and locally running a python script which will ask a few questions
Both options will end up generating a “blank” plugin which is a fully buildable, testable, editable and deployable plugin, which simply copies the stereo input to the stereo output so that it is easy to build from there.
Once the plugin is generated, feel free to edit/modify any file you want as the generating phase is only meant to be run once in order to quickly get a plugin with all the pieces (and boilerplate code) in place.
Step 2 - Run the configure script
The plugin contains a python 3 configure.py script to help configuring the project.
configure.py is a python 3 script and can be invoked directly on macOS. On Windows you need to invoke python
# macOS
> ./configure.py

# Windows
> python configure.py
You can use the -h option to see the usage:
> ./configure.py -h
usage: configure.py [--h] [--n] [--f] [--r] [---vst3 VST3_SDK_ROOT] [--G GENERATOR] [--B BUILD_DIR] [--- <cmake_options>]

positional arguments:
  cmake_options         Any options for cmake

optional arguments:
  -h, --help            show this help message and exit
  -n, --dry-run         Dry run (prints what it is going to do)
  -f, --force           Force a regeneration (delete and recreate build
                        folder)
  --vst3 VST3_SDK_ROOT  Path to the VST3 SDK (optional)
  -r, --release         Use CMake Release build type (for single-config
                        generators)
  -G GENERATOR, --generator GENERATOR
                        CMake generator (optional)
  -B BUILD_DIR, --build-dir BUILD_DIR
                        Build folder (defaults to ./build)

Notes
  ---vst3 defaults to /Users/Shared/Steinberg/VST_SDK.<JAMBA_VST3SDK_VERSION>

  -G defaults to "Xcode" on macOS and "Visual Studio 17 2022" for Windows10
  run 'cmake --help' to get the list of generators supported

  For single-config generators, Debug is used by default and can be changed with -r for Release
  For multi-config generators, -r is ignored

  To provide extra options to CMake you do it this way
  python3 configure.py -- -Wdev

Examples
  # Specify an explicit path to the VST3 sdk and uses default generator
  python3 configure.py ---vst3 /opt/local/VST_SDK.3.7.0

  # Use default paths and uses another generator
  python3 configure.py -G "CodeBlocks - Unix Makefiles"

  # Use defaults
  python3 configure.py
By default a build subdirectory of the directory from which you run the command will be created, but this can be changed with the -B option.
If you have not installed the VST3 SDK in its proper location, you can use the --vst3 options to specify its location.
You can let Jamba simply download the VST3 SDK for you but, long term, it is not recommended as it is a big download.
# Example of run (from the source tree, but can be ANYWHERE)

> cd /mnt/vault/tmp/acme-Kooza-plugin
> ./configure.py
-- The C compiler identification is AppleClang 11.0.0.11000033
-- The CXX compiler identification is AppleClang 11.0.0.11000033
-- Check for working C compiler: /Applications/Xcode11.3.1.app/Contents/Developer/Toolchains/XcodeDefault.xctoolchain/usr/bin/clang
-- Check for working CXX compiler: /Applications/Xcode11.3.1.app/Contents/Developer/Toolchains/XcodeDefault.xctoolchain/usr/bin/clang++
-- Check for working CXX compiler: /Applications/Xcode11.3.1.app/Contents/Developer/Toolchains/XcodeDefault.xctoolchain/usr/bin/clang++ - works
-- Detecting CXX compiler ABI info
-- Detecting CXX compiler ABI info - done
-- Detecting CXX compile features
-- Detecting CXX compile features - done
-- Fetching jamba https://github.com/pongasoft/jamba/tree/v5.0.0
-- jamba git version - v5.0.0 | jamba git tag - v5.0.0
-- VST3_SDK_ROOT=/Users/Shared/Steinberg/VST_SDK.3.7.0
-- Building with Xcode version: 11.3.1
-- macOS Deployment Target: 10.14
-- SMTG_PLUGIN_TARGET_PATH is set to : /Users/ypujante/Library/Audio/Plug-ins/VST3
-- SMTG_MYPLUGINS_SRC_PATH is not set. If you want to add your own Plug-ins folder, specify it!
-- Found EXPAT: /usr/lib/libexpat.dylib (found version "2.2.6")
-- VSTGUI_ROOT is set to : /Users/Shared/Steinberg/VST_SDK.3.7.0
-- SMTG_COREAUDIO_SDK_PATH is set to : /Volumes/Development/github/org.pongasoft/jamba/audio-unit/CoreAudioSDK/CoreAudio
-- Found Python3: /Library/Frameworks/Python.framework/Versions/3.8/bin/python3.8 (found version "3.8.1") found components: Interpreter
-- Jamba main script available at /mnt/vault/tmp/acme-Kooza-plugin/build/jamba.sh. Use -h option for help.
-- Fetching googletest https://github.com/google/googletest/tree/703bd9caab50b139428cea1aaff9974ebee5742e
-- Found PythonInterp: /opt/local/bin/python (found version "2.7.8")
-- Looking for pthread.h
-- Looking for pthread.h - found
-- Performing Test CMAKE_HAVE_LIBC_PTHREAD
-- Performing Test CMAKE_HAVE_LIBC_PTHREAD - Success
-- Found Threads: TRUE
-- Adding target acme_Kooza_test for test cases: /mnt/vault/tmp/acme-Kooza-plugin/test/cpp/test-Kooza.cpp
-- Configuring done
-- Generating done
-- Build files have been written to: /mnt/vault/tmp/acme-Kooza-plugin/build
Please ignore the output about SMTG_MYPLUGINS_SRC_PATH not being set as it is displayed by the VST SDK but Jamba does not use it.
The main point of running this command is to configure the project, which is to invoke the CMake configuration phase. This will trigger a download of the dependencies (jamba, GoogleTest and the SDK if not local), setup the jamba.sh (resp. jamba.bat) main script that you will use in the next step and create all the CMake targets. This script is a wrapper around invoking cmake with the right set of parameters as shown when using the -n option:
> ./configure.py -n
cmake "-B" "build" "-DCMAKE_BUILD_TYPE=Debug" "-G" "Xcode" "/Volumes/Vault/tmp/acme-Kooza-plugin"
After this step, you can open the project in XCode (resp. Visual Studio) as the project has been created in the build folder generated (ex: Kooza.xcodeproj). Note that you can also open the project directly in CLion without even running this step since CLion natively supports cmake.
Step 3 - Build and test the plugin
The skeleton plugin main processing code simply copies the (stereo) input to the output. It is now ready to be built and tested. For this you use the jamba.sh (resp. jamba.bat) script that was generated during Step 2.
Check the jamba.sh documentation page for more details about the command.
Since Jamba 5.0.0, all commands have an equivalent target. So if you open the project in an IDE, you can simply select the equivalent target.
Running jamba.sh -h (resp. jamba.bat -h) gives you the list of all commands the script understands.
> jamba.sh -h
usage: jamba.sh [-hnvbdr] <command> [<command> ...] [-- [native-options]]

positional arguments:
  command        See "Commands" section

optional arguments:
  -h, --help     show this help message and exit
  -n, --dry-run  Dry run (prints what it is going to do)
  -v, --verbose  Verbose build
  -b, --banner   Display a banner before every command
  -d, --debug    use Debug build config
  -r, --release  use Release build config

Commands
  ---- Main commands ----
  clean     : clean all builds
  build     : build the plugin
  test      : run the tests for the plugin
  validate  : run the validator for the vst3 plugin
  edit      : run the editor (full editing available in Debug config only)
  info      : run the module info tool (display json info about the plugin)
  inspect   : run the inspector (inspects ALL installed plugins)
  install   : build and install all the plugins (vst3/audio unit)
  uninstall : delete the installed plugins (vst3/audio unit)
  archive   : create an archive containing the plugins

  ---- VST3 commands ----
  install-vst3   : install the vst3 plugin only
  uninstall-vst3 : uninstall the vst3 plugin only

  ---- Audio Unit commands ----
  build-au     : builds the Audio Unit only
  install-au   : install the Audio Unit only
  uninstall-au : uninstall the Audio Unit only

  ---- CMake target ----
  <command>   : Any unknown <command> is treated as a cmake target

  --- Native options ----
  Pass remaining options to the native tool (ex: -- -j 8 for parallel build)
By running jamba.sh validate, you will build the plugin and runs the VST3 validation tool that is provided by the VST SDK to validate that the plugin is actually a VST3 plugin and behaves properly.
The first time you run this command it will take a little while since most of the SDK needs to be built.
For the validate command, the equivalent CMake target is jmb_run_validator.
# Example of run
> ./jamba.sh validate
...
=== BUILD TARGET jamba OF PROJECT Kooza WITH CONFIGURATION Debug ===
...
...
** BUILD SUCCEEDED **

* Loading module...

	/mnt/vault/tmp/acme-Kooza-plugin/build/VST3/Debug/acme_Kooza.vst3

* Scanning classes...

  Factory Info:
	vendor = acme
	url = https://www.acme.com
	email = support@acme.com

  Class Info 0:
	name = Kooza_Debug
	category = Audio Module Class
	subCategories = Fx
	version = 1.0.0
	sdkVersion = VST 3.7.0
	cid = F900258E224440B4919ACC8402F2D2BD

  Class Info 1:
	name = Kooza_DebugController
	category = Component Controller Class
	subCategories =
	version = 1.0.0
	sdkVersion = VST 3.7.0
	cid = C701D2C0BA944D19BE739BD8ACCE742B
...
-------------------------------------------------------------
Result: 46 tests passed, 0 tests failed
-------------------------------------------------------------
Step 4 - Run the editor
Let’s now run the editor which is another tool that comes with the VST SDK and which lets you build, in a WYSIWIG fashion, the UI of your plugin.
For the edit command, the equivalent CMake target is jmb_run_editor.
> ./jamba.sh edit
...
You should see something like this (after you right click in the window and select Open UIDescription Editor).
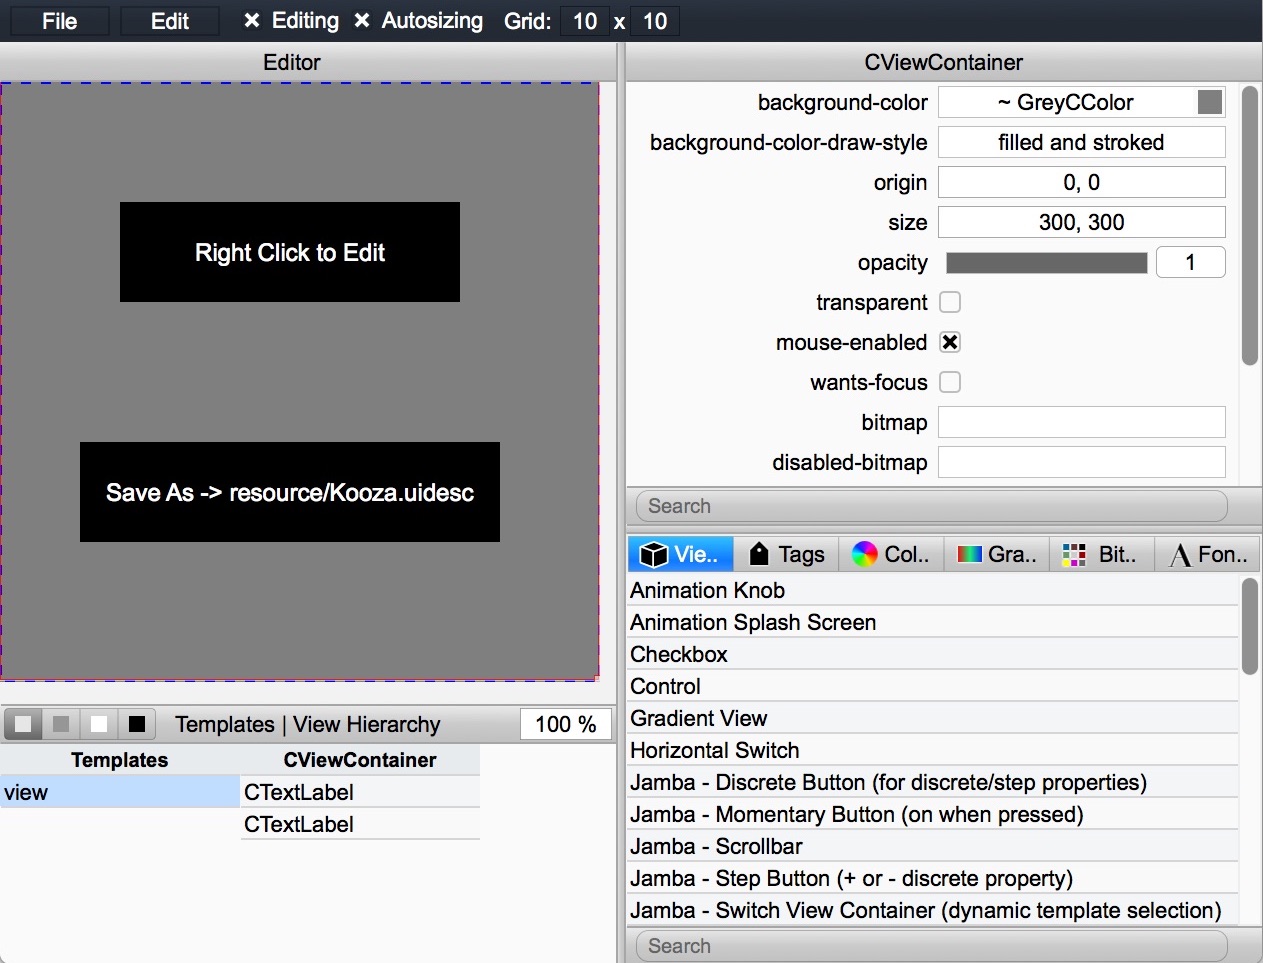
The skeleton plugin UI only contains 2 text labels that gives you instructions on what to do:
- right click to open the editor
- select menu
File / Save asto save the json file (which represents the UI) with the proper name in its proper location (should be under<PLUGIN_ROOT>/resource/<PLUGIN_NAME>.uidescas shown in the UI). After saving it the first time, you can simply selectFile / Save(or use the shortcut) once you make modifications.
Step 5 - Install the plugin
Now that the plugin builds properly (and pass validation), you should install it to be able to try it right away in your favorite DAW. Since the blank plugin is essentially a passthrough effect (copies input to output), you should be able to:
- see the plugin listed in the list of plugins of your favorite DAW (the plugin name will be
<xxx>_Debugsince we are building in debug mode, for exampleKooza_Debugin this example) - add the plugin as an effect to any instrument and verify that you can still hear the output of the instrument (passthrough)
For the install command, the equivalent CMake target is jmb_install_all.
> jamba.sh install
...
Installed vst3 plugin under /Users/ypujante/Library/Audio/Plug-Ins/VST3/Kooza_Debug.vst3
...
Installed au plugin under /Users/ypujante/Library/Audio/Plug-Ins/Components/Kooza_Debug.component
...
The editor is actually part of the plugin when building in Debug mode, so you can right click to open it (like in Step 5).
On macOS, if you start your DAW from the command line, you can see the output of the plugin (DLOG_F statements):
> /Applications/VST3PluginTestHost.app/Contents/MacOS/VST3PluginTestHost
2020-02-20 07:13:42.285 (   0.000s) [            A61C]     KoozaProcessor.cpp:18       0| [Kooza_Debug] KoozaProcessor() - jamba: v4.1.0-0 - plugin: v1.0.0
2020-02-20 07:13:42.286 (   0.000s) [            A61C]     KoozaProcessor.cpp:22       0| Parameters --->
| ID   | TITLE  | TYP | OW | TRS | SHA | DEF.N | DEF.S | STP | FLG   | SHORT  | PRE | UID | UNS |
-------------------------------------------------------------------------------------------------
| 1000 | Bypass | vst | rt |     |     | 0.000 | Off   | 1   | 65537 | Bypass | 4   | 0   |     |
-------------------------------------------------------------------------------------------------
2020-02-20 07:13:42.286 (   0.000s) [            A61C]     KoozaProcessor.cpp:39       0| KoozaProcessor::initialize()
2020-02-20 07:13:42.286 (   0.000s) [            A61C]     KoozaProcessor.cpp:60       0| RT Save State - Version=1 --->
| ID   | TITLE  |
-----------------
| 1000 | Bypass |
-----------------
2020-02-20 07:13:42.286 (   0.001s) [            A61C]    KoozaController.cpp:10       0| KoozaController()
2020-02-20 07:13:42.286 (   0.001s) [            A61C]    KoozaController.cpp:38       0| GUI Save State - Version=0 --->
| ID | TITLE |
--------------
2020-02-20 07:13:42.286 (   0.001s) [            A61C]                Kooza.h:89       0| RTState::write - 1000=0.000/Off
2020-02-20 07:13:42.286 (   0.001s) [            A61C]     KoozaProcessor.cpp:91       0| KoozaProcessor::setupProcessing(Realtime, 32bits, maxSamples=256, sampleRate=48000.000000)
2020-02-20 07:13:53.321 (  11.036s) [            A61C]    KoozaController.cpp:18       0| ~KoozaController()
2020-02-20 07:13:53.321 (  11.036s) [            A61C]     KoozaProcessor.cpp:71       0| KoozaProcessor::terminate()
2020-02-20 07:13:53.321 (  11.036s) [            A61C]     KoozaProcessor.cpp:31       0| ~KoozaProcessor()```
Step 6 - Add your own files
You are now ready to start implementing the logic of your plugin by adding new files
Adding source files
When you add new source files, add them to the CMakeLists.txt file in the vst_sources section (feel free to change the CMakeLists.txt to your liking, for example if you want to include all files without having to explicitly add them, although not recommended, this is possible… refer to cmake for more info).
# Source files for VST3
set(vst_sources
    "${CPP_SOURCES}/Kooza_VST3.cpp"

    "${CPP_SOURCES}/Plugin.h"
    "${CPP_SOURCES}/KoozaCIDs.h"

    "${CPP_SOURCES}/RT/KoozaProcessor.h"
    "${CPP_SOURCES}/RT/KoozaProcessor.cpp"

    "${CPP_SOURCES}/GUI/KoozaController.h"
    "${CPP_SOURCES}/GUI/KoozaController.cpp"
)
Adding (unit) test files
When you add new tests files, add them to the CMakeLists.txt file in the test_case_sources section.
# Location of the test cases
set(TEST_DIR "${CMAKE_CURRENT_LIST_DIR}/test/cpp")

# List of test cases
set(test_case_sources
    "${TEST_DIR}/test-Kooza.cpp"
)
Here is an example of unit test
#include <pongasoft/logging/logging.h>
#include <gtest/gtest.h>

namespace ... {

// PluginTest - Test1
TEST(PluginTest, Test1)
{
  DLOG_F(INFO, "Demonstrating test capability");

  ASSERT_EQ(4, 2+2);
}

... }
Jamba integrates with Google Test for unit testing but you can use something different. Check the CMake build documentation.
Adding resource files (GUI)
The way macOS and Windows handle GUI resources is very different (Info.plist vs .rc file). Thankfully Jamba makes it easy and will generate the right file for the right platform.
When you add new resources for the GUI, add them to the CMakeLists.txt file in the vst_resources section.
# Location of resources
set(RES_DIR "${CMAKE_CURRENT_LIST_DIR}/resource")

# List of resources (images)
set(vst_resources
    "${RES_DIR}/background.png"
)
In the UI editor when adding a bitmap and saving the xxx.uidesc file, the fullpath of the image might be recorded. Make sure to edit the xxx.uidesc and modify it to keep ONLY the filename
# this is WRONG!!!!!
"bitmaps": {
  "background": {
    "path": "/private/tmp/pongasoft-Kooza-plugin/resource/background.png"
  },
},

# this is right
"bitmaps": {
  "background": {
    "path": "background.png"
  },
},
cmake automatically detects changes to CMakeLists.txt so you should not have to do anything special when you make any changes.
Step 7 - Next
Here are some recommended steps:
- If you have never written a VST3 plugin I would suggest reading the VST3 documentation that comes with the SDK (you can find more information on the concepts, how the editor works, etc…). At the end of the day you are still writing a VST3 plugin not a Jamba plugin!
- Check the CMake build documentation for in-depth details on the build and how to configure it.
- Check jamba-sample-gain for documentation and explanation of the Jamba concepts and in particular:
- Check
<Name>.hwhich is where you define the Vst (and Jmb) parameters your plugin will use - Check
RT/<Name>Processor.cppwhich contains the main logic of the plugin - Use the editor to change the UI of the plugin (which then saves the
resource/<Name>.uidescjson file). You can edit the json file by hand, but it is definitely recommended to use the editor to do so.
- Check
- Check the VST3 SDK section so that the VST3 SDK is installed for all your plugins instead of being donwloaded with each one.
Tip
If you have followed the quickstart steps, the SDK has been downloaded during Step 2 so you can simply copy it in a more permanent location.